LiteMage Cache Warmup
Magento includes a built-in cronjob to crawl the site and warm up the full page cache. LiteMage also has its own cron job to do this.
To enable LiteMage cache warmup, the following steps should be taken.
Initial Setup
- LiteMage cache should be enabled in your .htaccess file. The following code should be added to the .htaccess file under the root directory of each Magento installation:
<IfModule Litespeed>
LiteMage on
</IfModule>
- LiteMage cache should be enabled in LiteMage Configuration. From the Magento Admin page: Navigate to System → Configuration → LiteMage Configuration and under General Settings set Enable LiteMage Cache to Yes.
- Enable LiteMage Cache: From the Magento Admin page: Navigate to System → Configuration → LiteMage Configuration and under Cache Warmup set Enable Cache Warmup to select “Store site map”, “Auto collected (deep crawling) URL list” “Delta list after tag purge” in latest version (or Yes in ealier version).
- The location of PHP has to be specified in cron.sh. Update cron.sh and change the PHP_BIN setting from `which php` to the location of your PHP directory. For example, it may be PHP_BIN=/usr/local/bin/php if you use Cloud Linux PHP Selector, or PHP_BIN=/usr/local/lsws/fcgibin/lsphp5 if you installed and configured lsphp there.
- On initial setup, it is strongly recommended to run the warm up a few cycles. Take note of how long it takes and how many resources it is using. Tune the thread count and load parameters until satisfied with the combination. Jot down how long it takes to run a full round.
- The public Time To Live (TTL) duration depends on how the store is run. If the store is not updated often and/or has a delta crawler enabled, it can be beneficial to set a long public TTL.
Recommendation settings are as followed:
- X = The time it takes for a warmup to finish.
- Public TTL = at least 5 times the value of X.
- Warmup Interval = Public TTL minus 2 times the value of X.
- Example: Suppose my store takes 1 hour to run a full warmup cycle. The Public TTL should be set to at least 5x the cycle time. In my case, this is 3 hours. The warmup interval should be set to the public TTL minus 2x the cycle time. In my case, this is 24 hours - 6 hours = 18 hours. To describe my settings, I would say: My pages are cached for 24 hours. Every 18 hours, I will run another warm up cycle. Each cycle takes 3 hours to complete. This leaves me roughly 3 hours worth of insurance in case warm up takes longer than I expected, while still guaranteeing that my pages are always cached.
Crontab Setup
Setting up the crontab is a fairly simple process that requires shell access. After logging into shell run the following commands:
WARNING! - Do not setup crontab as root user, always specify a user by using -u variable!
Running as root user is a security risk and will cause LiteMage to not work properly!
First we will need to edit the crontab file, replace “magentouser” with the user account that is running magento.
crontab -u magentouser -e
Second we need to add the following line into the crontab, replace /home/magentouser/public_html/ with the path to your magento install.
* * * * * /home/magentouser/public_html/cron.sh cron.php
That's it! The LiteMage crawler should now be working.
Check That The Magento cron job Is Working
Issues do happen, here we will go over how to check if cron is executable and to check if the crawler is running.
If you check the permission mask for cron.sh, you will see that it is a non-executable file.
ls -l cron.sh
-rw-r--r-- 1 magentouser magentouser 746 May  6 17:19 cron.sh
Because of this the cron job will not be executed and must be changed to the following:
* * * * * /bin/sh /home/magentouser/public_html/cron.sh cron.php
To verify if the cron is running ok, you can check cron log:
vi /var/log/cron
And you should see something like:
Oct 25 18:59:01 test CROND[12606]: (magentouser) CMD (/bin/sh /home/magentouser/public_html/cron.sh cron.php)
If everything is okay, LiteMage cache warmup should be executed and can be checked by doing the following:
cd /magento_installation_directory/var/cache/
find . | grep WARMUP

./mage--6/mage---internal-metadatas---160_LITEMAGE_WARMUP_URLMAP
./mage--6/mage---160_LITEMAGE_WARMUP_URLMAP
./mage--5/mage---160_LITEMAGE_WARMUP_META
./mage--5/mage---internal-metadatas---160_LITEMAGE_WARMUP_META
Note1: var/cache directory is used only if user is using file system based cache. if you use redis, you don't see data there.
Warmup files showing up means everything is okay while not appearing indicates that warmup is not being executed. If this is the case, something is wrong with your LiteMage warmup configuration.
By default, the LiteMage cron job is set to run every 10 minutes (which is set in app/code/community/Litespeed/Litemage/etc/config.xml) to check the warmup.
For more information on configuring and scheduling Magento cron jobs, see Magento User Guide - Setting Up Cron Jobs and Magento User Guide - Cron (Scheduled Tasks).
Changing How Often The LiteMage's Warm Cache cron job Runs
The intervals at which the LiteMage cron job runs can be configured in LiteMages config.xml file located under …/app/code/community/Litespeed/Litemage/etc.
Near the bottom of this file in the you will see the <crontab> tag (directly under <config>).
<crontab>
        <jobs>
            <litemage_warmup_cache>
                <schedule>
                    <cron_expr>2,12,22,32,42,52 * * * *</cron_expr>
                </schedule>
                <run>
                    <model>litemage/observer_cron::warmCache</model>
                </run>
            </litemage_warmup_cache>
            <litemage_crawl_delta>
                <schedule>
                    <cron_expr>*/5 * * * *</cron_expr>
                </schedule>
                <run>
                    <model>litemage/observer_cron::crawlDelta</model>
                </run>
            </litemage_crawl_delta>
        </jobs>
</crontab>
This section controls the scheduling of LiteMage's cron jobs with the important part being
<cron_expr>0,10,20,30,40,50 * * * *</cron_expr>
which says to do what is in the following <run> tag, warm the cache in this case, every 10 minutes.
While it is recommended to leave this as is, you can modify it as needed to change the interval at which your site is crawled. So for example, if you wanted to crawl every 5 minutes instead, you could change this line to
<cron_expr>0,5,10,15,20,25,30,35,40,45,50,55 * * * *</cron_expr>
Note: Create a backup of your config.xml file after making any changes as they will be overwritten when upgrading and need to be re-added.
Configuring LiteMage's Cache Warmup cron job
LiteMage's cache warmup cron job can be configuring through the Magento Admin Panel. This can be done under Cache Warm Up in System→Configuration→LiteMage Configuration.
If you have modified the LiteMage cron job time interval mentioned in the previous section, please ensure that Maximum Run Time (seconds) is set to a lower number of minutes. You can divide your Maximum Run Time setting by 60 to get the value in minutes. For example, a setting of 300 is equal to 300/60 = 5 minutes.
It is possible that LiteMage will not finish crawling your site within the set Max Run Time. This can be caused by a large site or a high server load at run time, where the crawler will stop to prevent it from using up your remaining server resources. In these cases, the crawler should continue where it left off on its next run.
You can check on the crawlers progress at the bottom of the System→Cache Management page in the Magento Admin Panel or click the reset link to restart a crawlers queue without flushing your cache.
To increase the speed at which your site is crawled, try increasing your Maximum Crawler Threads setting.
For more information on the different Cache Warm Up settings, see our Cache Warmup Configuration page.
Defining A Custom Warm Up URL List
Use Cases
- You’re front page displays some random products from a certain category, “best sellers” for example. You can set the “Homepage TTL” to a shorter interval like 60 minutes, or set up a custom warm up URL list with a 5 minute interval and a priority of 10 (so every 5 minutes it will be refreshed to show different random items).
- You cached “shop_by_brand” pages (these pages will not be auto-purged). You can refresh these pages every 30 minutes to make sure they are accurate.
- You have a special configurable product pages with constantly changing inventory. In this case, as the pages are likely very heavy, it may be okay to keep them out-of-date for a while to avoid having to regenerate after flushing.
Benefits
One can define their own list of URLs to be refreshed at specified intervals and priority. During crawling, the LiteMage crawler will hit the backend and regenerate the page, updating the cached copy. The next visitor to the site will then get the newly generated cached copy. Regular visitors will still be served from cache and will not notice that this is taking place. In this way cached copies of certain pages can be updated frequently while still serving all visitors from cache 100% of the time.
Setup
- Collect all the related brand URLs and save them into either a single file or multiple files if needed. For example
/home/user/public_html/var/litemage/brands.url. Each file listed should contain a list of custom-defined URLs (one per line). These URLs are relative to a store’s base URL (withouthttp://domain/storepath/). - In the Magento Admin Panel, navigate to LiteMage Configuration→Store View and add the created URL lists to Custom Defined URL List Files.
Here, one can specify a list of Custom URL files with varying intervals and priorities. Each line should contain the absolute path to a single file followed by a crawling interval and a priority. The crawling interval must be set to a number in seconds greater than 600. The priority must be set to a number larger than 0, where a lower number means a higher priority.
For example:
One can set the priority for their English store as follows
/home/user/public_html/var/litemage/brands.url 1800 10
And then set the priority of their French store as follows
/home/user/public_html/var/litemage/brands.url 1800 20
This will have the crawler crawl every 30 minutes starting with the English store before moving on to the French store.
Enabling The Debug Log
- If you want to run warmup again, flush the LiteMage cache from System → Cache Management. The Magento crawler will run a new warmup at the next time interval ( 0, 10, 20,30,40,50 for each hour). Check the log for running details.
tail -f system.log
- Catalog and product pages will be crawled and cached during the warmup but not filter pages as they can only be cached when hit at least once.
grep "crawling url" system.log
will list all crawling urls.
LiteMage Crawler Warm-up Status
In your Magento Admin Panel, at the bottom of the System → Cache Management page, is a section where you can monitor and manage the crawler's status.
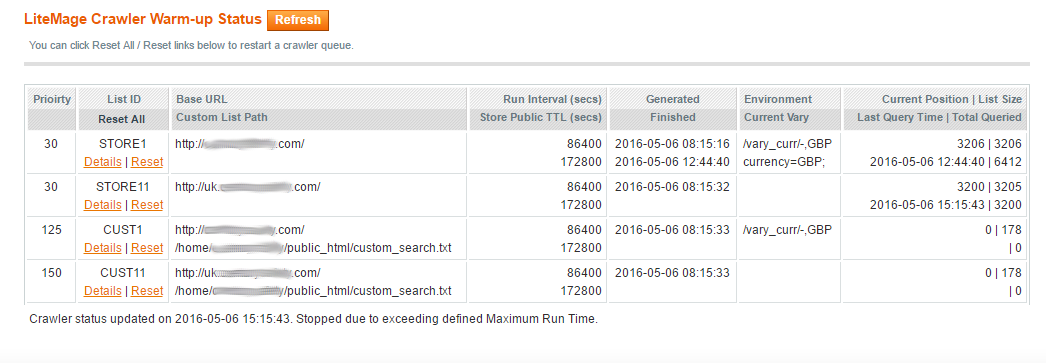
Each crawler queue is listed as its own row in the table, sorted ascending based on priority. Included with each crawler listing is:
- Base URL - The URL from which the crawler starts crawling this queue.
- Custom List Path - This is the location of the list of paths the crawler will crawl for this queue. This can be viewed by clicking on the “Details” link for each queue.
- Run Interval (in seconds) - The time interval at which the crawler will run this queue. The first site above has a Run Interval of 86400 seconds or 24 hours meaning that the crawler will crawl this queue every 24 hours.
- Store Public TTL (in seconds) - The time interval at which the public cache will be invalidated for this site. Refer again to our first example above where Store Public TTL is set so the public cache is purged every 172800 seconds or every 48 hours.
- Generated - The time and date when the crawler queue was last generated.
- Finished - The time and date when the crawler last finished crawling this queue. This only appears if the crawler finished crawling this queue.
- Environment - A listing of all environment varies set for this queue. In the first row above, the varies listed are “-” which represents the default currency and GBP.
- Current Vary - The vary the crawler is currently crawling, this will remain as the last vary from your Environment list if the crawler finishes this queue.
- Current Position - The current position of the crawler in this queue.
- List Size - The size of the crawler's queue before varies are included.
- Last Query Time - The last time and date a page was crawled in this queue.
- Total Queried - The current total number of pages crawled in this queue including varies. When the crawler completes the queue, this should be equal to the number of varies times List Size. In the first row above, we have 2 varies (default and GBP). Because the first queue was completely crawled, 6412 pages were crawled. 2 varies times 3206 pages equals 6412 total pages.
A crawler queue can be reset by clicking the corresponding “Reset” link in this section. This will remove values for: Custom List Path, Generated, Finished, List Size, and Last Query Time which will be repopulated when the crawler regenerates the list and crawls it. This will also set Current Position and Total Queried back to zero, starting the queue from the beginning the next time the crawler crawls it.
Keeping Public Cache Warm Indefinitely
Using LiteMage's crawler to warm your cache can lead to a huge improvement in performance by regularly re-cacheing pages that might otherwise have expired. By slightly changing your LiteMage configuration, you can set this up so this is always the case.
LiteSpeed Web Server is able to detect the difference between requests coming from the crawler and those from elsewhere allowing it to serve user requests from cache while still letting the crawler hit the backend. This results in your cache being in an always warm state with visitors never hitting the backend.
To do this, change the Default Public Cache TTL setting in the General Settings section of your LiteMage Configuration screen to an amount of time greater than your Warm Up Interval setting in the Cache Warmup section.
For example:
By setting the Default Public Cache TTL to 86400 seconds (24 hours)

and the Warm Up Interval to 43200 seconds (12 hours)

the crawler will update your publicly cached pages before their cache entries have the chance to expire.
Note: This can be done on a per-store basis by changing your Current Configuration Scope.
Note: LiteMage will not crawl your site all at once. In order to prevent the crawler from using all of your server's resources and allow flexibility, the crawler will be run once every 10 minutes (600 seconds). You can set the Maximum Run Time for a crawler run to any value less than 600 seconds, the default duration being 5 minutes (300 seconds). When the crawler reaches this time limit, it stops until it's next run and then resumes where it left off. If your Default Public Cache TTL setting is too low, parts of your site will not remain in cache.
Note: You can restart a crawlers queue without flushing your cache by clicking the reset link at the bottom of the System→Cache Management page in the Magento Admin Panel.
Note: Users can also set their own Custom Defined Url list in case they wish to refresh certain URLs more or less frequently than their crawler queues.
Note: If, after updating a page, a user wants to refresh the cached copy of this page, they can use the following command in a cron job to refresh the cached copy programmatically:
curl -A "litemage_walker" https://your_url
Refreshing the cache is not the same as invalidating it. When the cached copy is invalidated, the next user to hit the invalidated page will have to wait longer for the page to load as there is no copy to serve from cache. When the cache is refreshed, the cached copy is overwritten with the current version of the page.
The difference between the LiteMage Purge command and the curl command listed above is that the Purge command invalidates the cache for the current page, while the curl command refreshes the cached copy of the given URL.
Warm Up Still Not Working
Magento System Cron issue
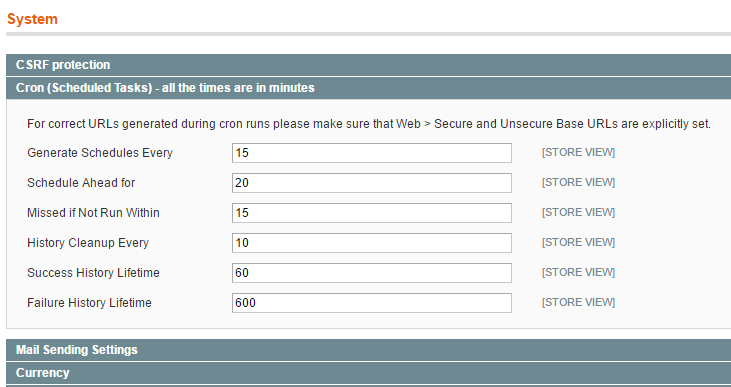
If you have triell of the above and LiteMage is still not working properly and showing the Warm-up List details, it is likely that incorrect values in Magento's Cron (Scheduled Tasks) setting is blocking cron jobs.
We suggest returning these settings, located under System > Configuration > Advanced > System > Cron (Scheduled Tasks), to their defaults below to fix the problem.
  Generate Schedules Every 15
  Schedule Ahead for 20
  Missed if Not Run Within 15
  History Cleanup Every 10
  Success History Lifetime 60
  Failure History Lifetime 600
You can also enable debug log, purge the cache and check the log to see if the crawler is running, expecially during the crawler scheduled time, such as 2-4, 12-14, 22-24, 32-34, 42-44, 52-54.
tail -f var/log/system.log
You should be able to see log for cache purge:
2017-10-27T20:31:04+00:00 DEBUG (7): LiteMage (4) Reinit Delta queue [time=0.85439600 1509136264] tags=
2017-10-27T20:31:04+00:00 DEBUG (7): LiteMage (3) SetPurgeHeader: * (triggered by purgeAllByAdmin)
then crawler should start running like the following and run for a couple of minutes until all done.
2017-10-27T20:34:15+00:00 DEBUG (7): LiteMage [litemage_runner:103.16.17.40:52630:76984300] (2) ****** PRECHECK route_action [catalog_category_view] /health.html
2017-10-27T20:34:15+00:00 DEBUG (7): LiteMage [litemage_runner:103.16.17.40:52626:80860200] (2) ****** PRECHECK route_action [catalog_category_view] /special-deals.html
2017-10-27T20:34:15+00:00 DEBUG (7): LiteMage [litemage_runner:103.16.17.40:52628:82403400] (2) ****** PRECHECK route_action [catalog_category_view] /fitness.html
2017-10-27T20:34:15+00:00 DEBUG (7): LiteMage [litemage_runner:103.16.17.40:52624:88625900] (2) ****** PRECHECK route_action [cms_index_index] /
2017-10-27T20:34:16+00:00 DEBUG (7): LiteMage [litemage_runner:103.16.17.40:52632:07812400] (2) ****** PRECHECK route_action [catalog_category_view] /beauty.html
2017-10-27T20:34:25+00:00 DEBUG (7): LiteMage [litemage_runner:103.16.17.40:52624:88625900] (3) Set Header X-Litespeed-Tag: G.9,S.1
2017-10-27T20:34:25+00:00 DEBUG (7): LiteMage [litemage_runner:103.16.17.40:52624:88625900] (3) Set Header X-Litespeed-Cache-Control: public,max-age=43200,es
… … …
If nothing shows in the log, then there is still something wrong either on configuration or system cron job.
You should also check cron process
ps -ef | grep cron.php
You should be able to see something similar like the following, if not, most likely your system cron has some problem.
dealwel+ 4489 1 10 04:23 pts/0 00:00:17 /usr/local/lsws/fcgi-bin/lsphp5 /home/dealwellne/domains/example.com/public_html/cron.php
cron.sh script issue
We did see some case that system cron seems to be showing in the cron log in /var/log/cron but actually there is no such progress running. It did start to run when we change to documentroot and manually run the cron job.
vi /home/dealwellne/domains/example.com/public_html/
 cd /home/dealwellne/domains/example.com/public_html/
 sudo -u dealwellne ./cron.sh
then we modified the cron.sh script to reflect the above and everything runs ok.
vi cron.sh
#!/bin/sh
# location of the php binary
if [ ! "$1" = "" ] ; then
CRONSCRIPT=$1
else
CRONSCRIPT=cron.php
fi
#PHP_BIN=`which php`
PHP_BIN=/usr/local/lsws/fcgi-bin/lsphp5
# absolute path to magento installation
INSTALLDIR=`/bin/echo $0 | sed 's/cron\.sh//g'`
#       prepend the intallation path if not given an absolute path
if [ "$INSTALLDIR" != "" -a "`expr index $CRONSCRIPT /`" != "1" ];then
  if ! ps auxwww | grep "$INSTALLDIR""$CRONSCRIPT" | grep -v grep 1>/dev/null 2>/dev/null ; then
      echo "hello world"
      echo "$PHP_BIN $INSTALLDIR$CRONSCRIPT"
      cd /home/dealwellne/domains/example.com/public_html/
      $PHP_BIN ./cron.php &
#       $PHP_BIN "$INSTALLDIR""$CRONSCRIPT" &
  fi
else
  if  ! ps auxwww | grep " $CRONSCRIPT" | grep -v grep | grep -v cron.sh 1>/dev/null 2>/dev/null ; then
      $PHP_BIN $CRONSCRIPT &
  fi
fi
Magento AOE Scheduler doesn't mark completion of ''litemage_warmup_cache''
Magento AOE Scheduler extension sits on top of Magento's default cron functionality allowing the users to manage the jobs and visualize the timeline.
LiteMage works with AOE scheduler most of the time. However, occasionally, Magento AOE scheduler sometimes believers the LiteMage warmup process is always running while it has stopped by the max execution time hence AOE scheduler doesn't start next litemage_warmup_cache at all.
If you navigate to Magento Admin > Scheduler > Scheduler Timeline, you might see litemage_warmup_cache highlighted either in red or orange. It means the cron is hanging and is not running propery.


Navigate to Magento Admin > System > Scheduler > Job Configuration, select litemage_warmup_cache then in the right top corner Actions, select Run now, then press the Submit button.

Check the LiteMage cron log, like so:
tail -f /home/jsmith/public_html/var/log/litemage_crawler.log
2019-05-29T10:14:21+00:00 DEBUG (7): LiteMage [cron:jsmith:1559124843]  Generate url map for store1 url count=5320
2019-05-29T10:14:21+00:00 DEBUG (7): LiteMage [cron:jsmith:1559124843]  litemage_runner crawling  store1 urls (cur_pos:0) with cookie
litemage_cron=store1; Array
LiteMage [cron:jsmith:1559124843]   (
LiteMage [cron:jsmith:1559124843]       [0] => https://www.example.com/
LiteMage [cron:jsmith:1559124843]       [1] => https://www.example.com/business-office-writing/
LiteMage [cron:jsmith:1559124843]       [2] => https://www.example.com/business-office-writing/conference-business/business-card-holders/
LiteMage [cron:jsmith:1559124843]       [3] => https://www.example.com/business-office-writing/paper/promotional-calendars-diaries/
LiteMage [cron:jsmith:1559124843]       [4] => https://www.example.com/business-office-writing/desk/promotional-calculators/
LiteMage [cron:jsmith:1559124843]       [5] => https://www.example.com/business-office-writing/paper/promotional-notebooks/
LiteMage [cron:jsmith:1559124843]   )
LiteMage [cron:jsmith:1559124843]
2019-05-29T10:14:32+00:00 DEBUG (7): LiteMage [cron:jsmith:1559124843]  litemage_runner crawling  store1 urls (cur_pos:6) with cookie
litemage_cron=store1; Array
LiteMage [cron:jsmith:1559124843]   (
LiteMage [cron:jsmith:1559124843]       [0] => https://www.example.com/bags-and-travel/
LiteMage [cron:jsmith:1559124843]       [1] => https://www.example.com/clothing-accessories/
LiteMage [cron:jsmith:1559124843]       [2] => https://www.example.com/usb-technology/
LiteMage [cron:jsmith:1559124843]       [3] => https://www.example.com/food-and-drink/
LiteMage [cron:jsmith:1559124843]       [4] => https://www.example.com/health-personal-care/
LiteMage [cron:jsmith:1559124843]       [5] => https://www.example.com/bags-and-travel/travel/backpacks/
LiteMage [cron:jsmith:1559124843]   )
These results mean that the warmup did begin to run, so we know it works when started manually. A Run now action won't fix the Magento system scheduler problem, however, and the initiated cron will be stopped due to exceeding the defined Maximum Run Time in the configuration.

Take a look at litemage_crawler.log and you will see something like the following:
2019-06-19T16:17:05+00:00 DEBUG (7): LiteMage [cron:brandin1:1560960721] Stopped due to exceeding defined Maximum Run Time. cron meta end = Array
This is normal, since the cron was set to stop at 5 minutes before running again at the next scheduled time. If it had stopped there completely without further running, then there would be some Magento system scheduler issue which would need to be fixed.
By taking a look at your crontab (assuming your userid is jsmith) we see that you have too many of the same crons set up which may conflict with each other:
crontab -u jsmith -e

MAILTO=""
SHELL="/usr/local/cpanel/bin/jailshell"
* * * * * /usr/local/bin/php /home/jsmith/public_html/cron.php
SHELL="/usr/local/cpanel/bin/jailshell"
* * * * * /usr/local/bin/php /home/jsmith/public_html/cron.sh
SHELL="/usr/local/cpanel/bin/jailshell"
* * * * * /bin/bash /home/jsmith/public_html/scheduler_cron.sh --mode always
SHELL="/usr/local/cpanel/bin/jailshell"
* * * * * /bin/bash /home/jsmith/public_html/scheduler_cron.sh --mode default
SHELL="/usr/local/cpanel/bin/jailshell"
* * * * * /bin/bash /home/jsmith/public_html/cron.sh
SHELL="/usr/local/cpanel/bin/jailshell"
* * * * * /bin/sh /home/jsmith/public_html/cron.sh
* * * * * /bin/sh /home/jsmith/public_html/cron.sh cron.php
NOTE: You may need SHELL=“/usr/local/cpanel/bin/jailshell” on cPanel for jailshell.
The latest 1.9.x.x version of Magento may prefer to run /home/jsmith/public_html/scheduler_cron.sh instead of /home/jsmith/public_html/cron.sh. You can find this in Magento Admin > System > Scheduler > Insctuctions:
Run scheduler_cron.sh instead cron.sh (recommended)
Run every minute (recommended)
Edit your crontab:
sudo crontab -u jsmith -e
Add following configuration:
* * * * * /bin/bash /home/jsmith/public_html/scheduler_cron.sh --mode always
* * * * * /bin/bash /home/jsmith/public_html/scheduler_cron.sh --mode default

Remove all duplicated cron commands and only keep the above two configurations. 


The above-scheduled tasks view show the AOE scheduler's problem. litemage_warmup_cache was scheduled for 17:02 and run for 5 mins. However, AOE scheduler did not mark the task as “completed” at 17:07 and treats it running all the time. Then 17:12, 17:22, 12:32 etc scheduled litemage_warmup_cache never run due to the incorrect status issue for 17:02 's job. It may need your Magento developer or AOE developer to fix such issue to make litemage_warmup_cache run without any problem until the completion.
Warm Up for logged in users
Normally logged in users and non-logged in users will share the same cache copies. However, when you enable Separate Cache Copy per Customer Group in LiteMage configuration, LiteMage will have different cache copies.

The crawler warmup guide above only shows how to warm up the cache for non-logged in users. However, if you don't enable the crawler for logged-in users, the logged-in page may run slow during the first visit when there's a cache miss.
Enabling Cache for Logged-in Users
You should use the Crawl on Behalf of Logged-in Users setting in LiteMage's Cache Warm Up configuration. Enter user IDs from representative groups, separating them by space or comma. There is no need to place all user IDs. Any single user ID from that user group will do, since every user in that group will share the same cache copy. If you have enabled multi-customer groups, one user id from each group will do.
For the example from the above, with only distinguish between logged-in vs logged-out user selected, all logged-in users will be in the same group, and any logged-in user ID will do the job.
You should be able to get a user ID from the Magento admin customer menu. You can search for any particular email to find an ID.

Once you have the IDs, you can place them in Crawl on Behalf of Logged-in Users.

Save the configuration will make the change effective.
LiteMage Cache Warm Up configuration Reference
Please refer this for LiteMage Cache Warm Up configuration Reference